Setting up a virtual classroom requires planning, understanding, and basic technical knowledge. With little time, patience, and guidance, teachers can master the virtual classroom set up and provide high-quality education to students without any hassle.
Virtual classrooms are not a new phenomenon anymore. Classes online have become a part of our lives since the pandemic in 2020 forced us indoors. Of course, eLearning has been steadily gaining popularity since the early 2000s. Online teaching platforms like Byjus entered the market to provide virtual tutoring services. Companies like Coursera and Udemy offer online certifications and diplomas courses for varied subjects/ topics.
However, it was the Covid-19 pandemic that forced many teachers to set up virtual classrooms at home and teach kids online. In many developing countries, teachers had to learn the process with little or no training from professionals.
Thankfully, the EdTech companies are stepping in to help schools, colleges, and universities empower their faculty in setting up virtual classrooms with ease. Knowing how to use technology can simplify the entire process and make it hassle-free. What’s more, virtual classrooms don’t have to be limited to video conferencing apps like Zoom. There’s a lot to a virtual classroom. Integrating apps to the platform helps in automating testing, providing feedback, and so on. For example, you can integrate the platform with PrepAI, an automated question generator tool to create and conduct tests whenever you want.
What is a Virtual Classroom?
A virtual classroom is where the teacher and students interact on a digital platform instead of the physical classroom at school/ college. Everyone can be at different locations but can join the virtual classroom through the app/ website. The classes can happen in real-time (live sessions) or students can log into their accounts at selected times to learn from pre-recorded videos.
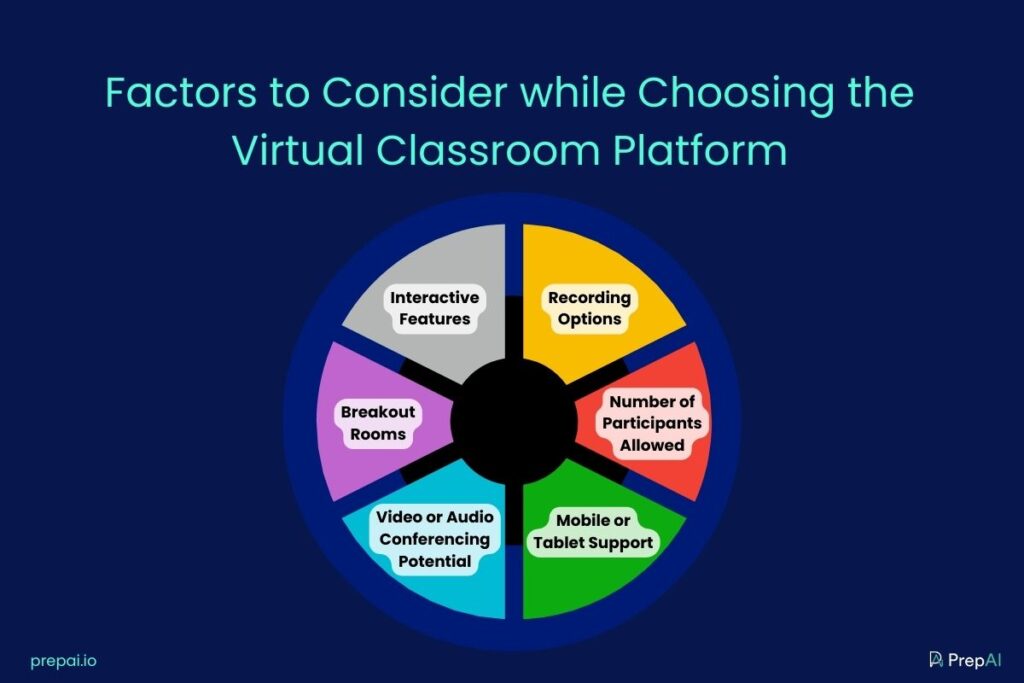
The most important thing to set up a virtual classroom is the software/ platform you need to conduct the classes online. Does the school use a Learning Management System (LMS), or are you free to use software of your choice?
How many students will join each session? How many sessions do you have to run per day? Though you can conduct online classes directly through Facebook Live, YouTube Live, etc., using software developed for virtual teaching is more beneficial.
Such software offers additional features to take attendance, conduct quizzes and assessments, send personal feedback to students, and so on. Some platforms allow third-party integrations to include these features. You also need an option to share the videos with students later on (VoD- Video on Demand) so that they don’t miss important lessons. Some educational institutions make the videos available for a limited time while others provide access for the entire duration of the course. However, most of them don’t allow users to download the videos forever.
Benefits of an Effective Virtual Classroom – For Teachers and for Students
Common Benefits:
- Virtual classrooms don’t have geographical restrictions. Teachers and students can join the online classes from any location.
- Access to live and pre-recorded material. Teachers can record video lessons in their free time and upload them to the platform. Students with access details can watch the videos when convenient for them.
For Teachers:
- Teachers can use assessment tools like PrepAI to automate recurring tasks such as creating test papers and correcting them. Conduct online tests and share results, discuss the answers, and do much without spending extra time on it.
- Use existing materials from online learning websites to provide text and multimedia content to students. Save the time spent manually creating courses from scratch.
- Become more accessible to students from far-off places and marginalized communities. Share your knowledge with more young minds and help them grow. Encourage diversity among students.
For Students:
- Students with personal responsibilities find it easier to manage their education through online learning. This is not limited to older students but also the younger ones from developing countries.
- Students can catch up with the lessons by accessing the recorded sessions. Whatever the reason for their absence during the live session, they don’t have to miss any important class. It is highly helpful for students suffering from health concerns.
- Students can pace the lessons as per their learning abilities. After participating in the live class, they can watch the recorded version as many times as they want until they fully understand the topic.
- The course material is also diverse and comes in many forms like ebooks, PDFs, images, videos, PPTs, audio notes, etc. Digital versions of the resources are convenient and portable.
- Collaboration with other students is another benefit of virtual classrooms. This encourages them to interact and work with classmates from different backgrounds, regions, cultures, etc.

How to Set Up a Virtual Classroom: Step by Step
The virtual classroom setup can be simple or elaborate. As a professional, it is more effective to invest in quality equipment even if the initial costs are high. Over time, you can generate enough ROI to earn profits.
You need the following to create a virtual classroom:
- Internet connection (make sure you opt for a reputed network provider and choose a higher bandwidth or one of those unlimited plans)
- Computer/ laptop/ smartphone (invest in a computer or laptop if you take classes regularly)
- Platform/ software to host the class (while third-party platforms offer free plans, you will need a paid subscription to make the most of its features)
- Headphones, microphone, speakers, and webcam (some webcams have built-in microphones and opt for the ones with noise-cancellation features)
- A separate room with minimum distractions (setting up a home office is essential if you want to conduct virtual classes online)
Creating a virtual classroom is not too difficult. It doesn’t have to be stressful if you plan the process and follow a systematic approach.

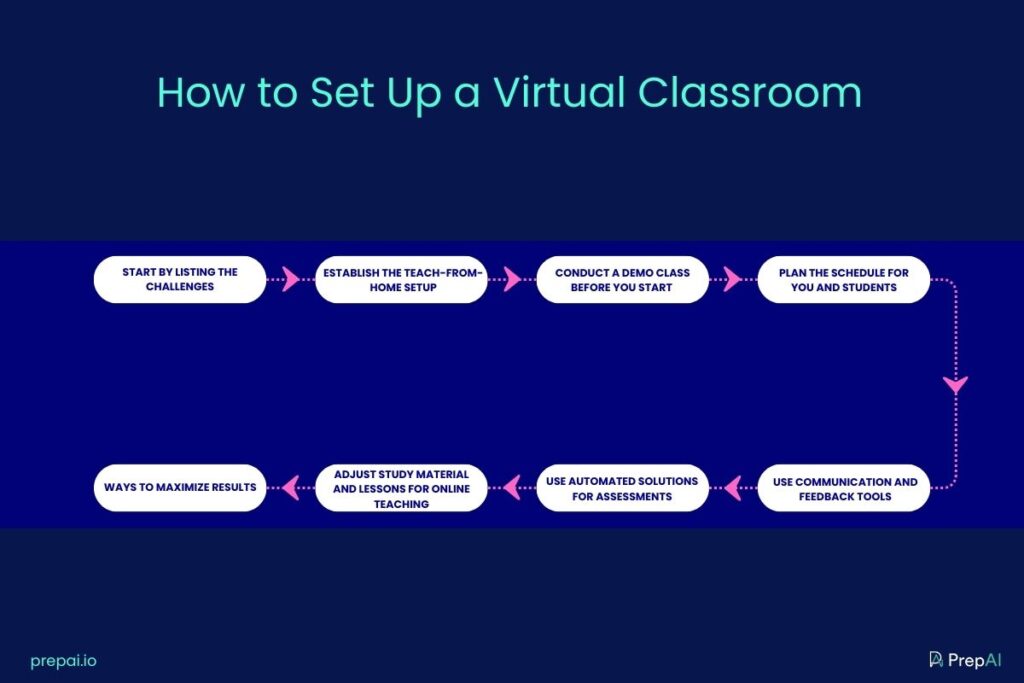
1. Start by Listing the Challenges
The first step is to list the requirements and challenges. The most common struggle faced by teachers was the lack of infrastructure for the virtual classroom setup and the necessary technical expertise. Taking the help of someone comfortable with technology will make the process smooth and stress-free.
- What kind of setup do you have in mind? Can you create an elaborate virtual classroom with the latest equipment, or do you want to make do with existing devices? How much will it cost?
- Define the class/ session for yourself and the students. Even though virtual classes can be conducted anytime through the day, you need to find a schedule that works for everyone.
- What problems do you foresee when conducting the class online? Issues like network failure, power cuts, background noise, etc., are external factors that are not in our control. However, you can still minimize distractions through appropriate measures.
- Which type of platform do you want to use for the virtual classroom? Do you want to live-stream the classes or share pre recorded videos? What other tools will you integrate with the platform?
- How comfortable are you in teaching in front of the camera? Do you need to practice it first?
Take time to understand the process and familiarize yourself with it. Go a little slow for a couple of days so that you and your students feel comfortable enough to focus on the lessons.
2. Establish the Teach-From-Home Setup
Teaching online from home for the first time can be a daunting task. Setting up a designated workspace will play a crucial role in creating the right atmosphere. Even though you don’t need an elaborate home office, you need a corner or a room with minimum distractions.
Choose a space that offers natural light and ventilation. Rearrange the furniture and move the clutter to another room. Use a desk/ table for the laptop/ computer. Invest in a new pair of headphones with a high-quality microphone. Your voice needs to be clear and audible to your students. Adjust the height of the webcam to be in line with your eyes. Have a pleasant/ neutral background so that students don’t get distracted. Some platforms allow users to set virtual backgrounds. This increases privacy and can reduce distractions.
3. Conduct a Demo Class Before You Start
Always run a demo session before you jump right into the virtual class. Test the virtual classroom setup at home to ensure that the connections are well in place. If you are placed in a region with frequent power cuts, you’ll need to make alternate arrangements to prevent interruptions. A home inverter setup will supply power to the system even when there’s no electricity.
Moreover, teaching virtually is different from teaching directly in front of the class. Do a demo with your friends or family members as students and get feedback from them. Are you facing the camera correctly? Is your voice too low or too loud? Are you speaking too fast? Is there a lag in the transmission? For example, teachers are used to projecting their voices in classrooms as every student should be able to hear them. The same is not necessary when teaching online. However, your voice should be clear and easy to follow.
You need to be aware of these aspects before you begin the actual lessons. Also, make sure to learn a few troubleshooting tips in case the microphone or the camera stops working. Understand the basics of how to mute/ unmute the mic, turn on and off the camera, etc. It will be hard if you need to rely on someone else for these.
4. Plan the Schedule for You and Students
Even if you are a teacher at home, you can’t teach when cooking or doing laundry. The virtual classroom online should have a schedule similar to traditional classes so that your day doesn’t get affected. A routine is very helpful to avoid excess stress. Even students find it easier to join virtual classes as per a schedule. This also ensures that all of you will get into a rhythm quickly and find it easier to concentrate on the lessons.
Use LMS tools like Microsoft Teams or Google Classrooms to create a comfortable online classroom setup for your class. Share a list of dos and don’ts in creative templates or images. Make sure your instructions are straightforward.
5. Use Communication and Feedback Tools
Since face-to-face interaction is limited, you need to pay a little more attention to keeping the communication channels open. Give students a chance to ask questions after the lesson is over. Get them involved in discussion using online forums and moderate the discussions. Thankfully, most virtual learning platforms have features to allow two-way communication. Students can also turn on and turn off the microphones and cameras during the sessions. Furthermore, you can assign extra roles and permissions to certain students to manage the classes (much like how class leaders help teachers in school).
Apart from phone calls, emails, and messages, you can set up virtual meetings with parents to share and discuss the students’ progress. Applications like Google Forms and Kahoot can help collect and share feedback with students. Don’t be afraid to try a new software/ app to make virtual classrooms more interesting and beneficial for students.
6. Use Automated Solutions for Assessments
Make the most of technology to reduce your workload. For example, PrepAI is an artificial intelligence-based question generator tool. It creates questions in different formats for the given input data, helps in conducting online tests, and shares instant results with the participants.
Using PrepAI will save time because you don’t need to create the test paper by going through pages of material. You can make the necessary changes to the questions created by the platform and conduct the class tests. Similarly, you can correct the assessments and give feedback through platforms like Socrative. You’ll feel less stressed when you use technology to help with online teaching.
In fact, you can create a quiz or test paper even when taking an online class and share the link with students to answer the questions during the same session.
7. Adjust Study Material and Lessons for Online Teaching
The study material used in physical classrooms may not be entirely suitable for online teaching. You need to keep students engaged during online classes. Creating infographics, videos, avatars, etc., will make virtual classes more fun and interesting for students. You can also use Virtual Reality (VR) tools if the budget permits.
This may feel like extra work but it doesn’t have to be! There are many online learning resources for teachers to download course material for free and paid subscriptions. Additionally, you can use online tools to convert text into infographics. Join virtual teacher communities to exchange notes and benefit from each other.
8. Ways to Maximize Results
Once you set up the virtual classroom at home and start teaching, you should try to maximize the results. Luckily, various EdTech tools help in preparing online quizzes, assignments, group projects, etc., in less time. With generative AI tools like ChatGPT, Bing, Bard, Gemini, etc., you can quickly create lesson plans, gather the necessary information online, convert it into presentations and quizzes, and do much more to make virtual classrooms interactive, educative, and exciting for students.
Gamification, collaboration, online student forums, and virtual one-to-one interaction are a few ways to encourage students to stay interested in online classes and complete the homework/ assignments on time.
Be Future Ready: Education in Metaverse
Metaverse is a VR space where users interact with a computer-generated environment. Users can also interact with each other. With gamification and AR gaining prominence in the education sector, metaverse seems to be the next logical step. A Florida-based charter school, Optima Classical Academy, founded Optima Academy Online (OAO), a platform for virtual classrooms using VR technology and Metaverse.
Live tutorials will be conducted in the metaverse classroom for different subjects, ranging from history to science to astronomy. It won’t be long before more schools and educational institutions follow the trend and offer courses through a metaverse.
To Sum Up
The change has begun, and it’s up to us to make the most of it. Teachers and schools can contact EdTech companies to help set up virtual classrooms and navigate the world of online teaching. Virtual learning can be easy and effective with the right approach.
FAQs
1. How to set up interactive virtual classrooms?
You can create a virtual classroom in many ways. For example, taking daily classes through Zoom or Google Meet apps on your smartphone also qualifies. However, a proper virtual classroom will have a designated space, equipment (computer/ laptop, webcam, headphones, microphone), and software (online tools).
2. Will free tools be enough to create a virtual classroom?
Initially, free tools and software will do the job and help you understand how virtual classrooms work. However, if you want to conduct daily lessons for multiple batches of students and provide interactive features, it is recommended to invest in paid subscriptions. The platforms also have payment gateway integrations to track your earnings from virtual classrooms.
3. What is the best platform for virtual classrooms?
It is hard to name a single platform as the best option for virtual classrooms. Google Classroom, Canvas LMS, Blackboard Learn, Adobe Connect, Kahoot!, BrainCert, etc., are some well-known online platforms that offer great features for teachers to create interactive virtual classrooms.


